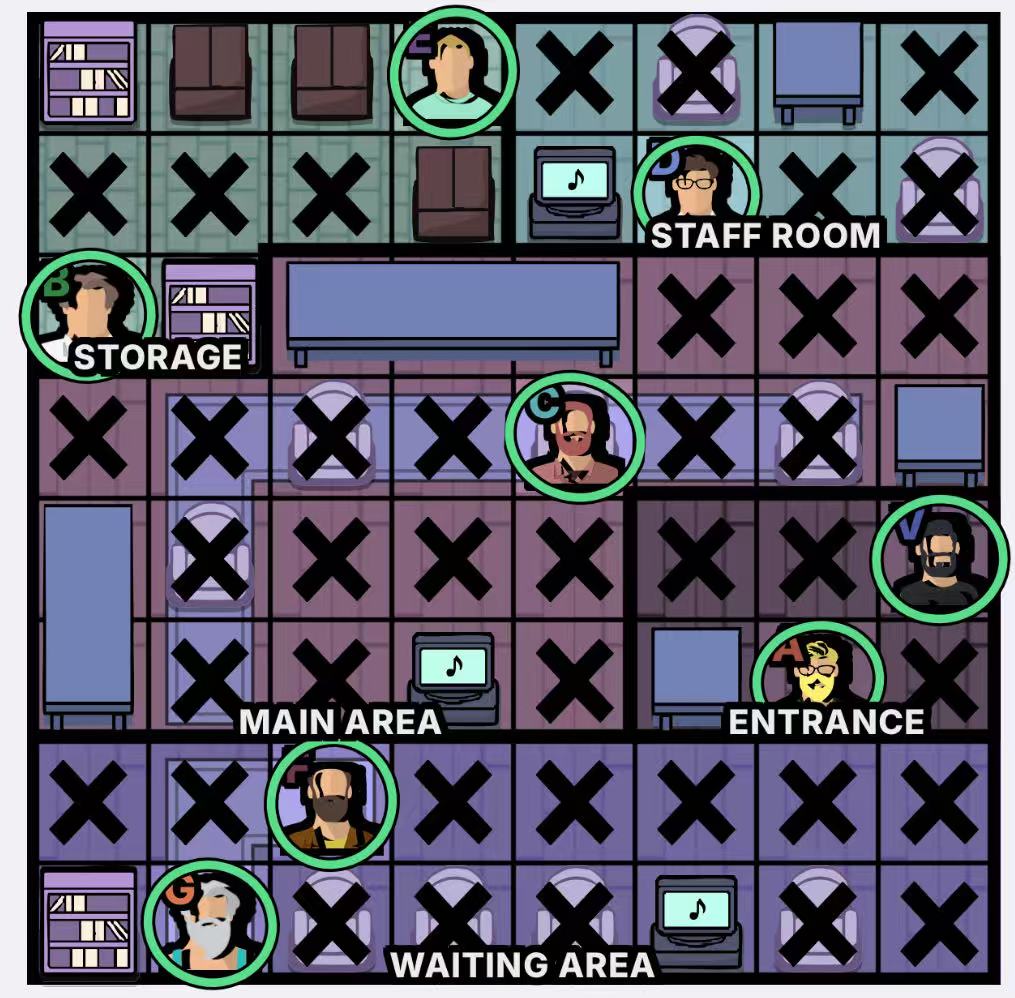
Do not jump to the solved board yet. Try a few more deductions first; if you are stuck, click View hint.
Coordinate note: R1 means row 1, C1 means column 1, and R1C1 is the upper-left cell. These hints are the official English text.
Begin by penciling in the possible squares for (A) and (G). For each, cross out their intersecting squares: R5C7 for (A) and R7C2 for (G). If anyone occupied either of those squares, (A) or (G) would have no valid squares left.Focus on (D)'s clue: he was alone and beside a TV. (D) cannot be in the Waiting Area because (G) is there, and he cannot be alone in the Main Area because that would leave R4 completely empty. Therefore, (D) must be alone in the Staff Room beside the TV. Cross out the squares that (D) cannot occupy.Since (E) has to be beside a box, he must be in either R1 or R2 in Storage. R1 and R2 must now be occupied by (D) and (E), so cross out any squares in those rows that neither of them can occupy.Because no one in (B)'s area had a beard, (B) can only be alone or with (E), since (E) is the only person without a beard. There is no area that allows (B) to be alone, so (B) must be in Storage, in R3C1. This narrows (G) down to R8C2.Because (C) was sitting in a chair, he must occupy one of the chairs in R4. Cross out the rest of the squares in that row. This leaves only one carpet square for (F), so (F) is in R7C3.There is now only one square left for (E), so (E) is in R1C4. (D) takes the last square in the Staff Room, R2C6. This narrows (A) to R6C7, and (C) takes the last chair in R4C5. The final remaining square, R5C8, goes to (V), which means (A) is the murderer.
All hint layers are open. Use the solved board only to check your final placement.
With your permission, Google Analytics, Mediavine Grow, Microsoft Clarity, Ahrefs and our site analytics may use cookies or similar technologies to measure visits and improve this guide. This choice controls optional analytics only. Google manages advertising privacy choices separately where required.